Hi I'm Pepper. My family and I are sharing pieces of our lives.
We hope to inspire you by showing that even small changes can make the biggest differences in your life. You don't have to go to extremes to become healthy. Just do it one habit, one meal, one walk, and one hug at a time.
Let's work together one piece at a time making better habits, eating healthier, getting moving, and most of all loving our families.
If you have been following along on Pepper Scraps you know that I’m on a long journey towards losing weight. I’ve lost 33lbs since January and 20+ lbs since March. This is my progress in pictures.
Join Project 52: Self Portraits
Lynda (from Daily Window) and I are not going to be putting up the linky anymore, but still want to invite you to participate in this project with us. I hope you will join us!
If you want to use the Project 52 badge feel free and grab it and use it on your post. You don’t have to do every week with us you can post just once even and you don’t have to follow the weekly theme either. We just hope that you will join us for some fun.
I was torn this week, did I want to do eggs or elephants. I decided to go with eggs because there were so many great egg crafts but no elephant crafts. If you know any good elephant crafts please send them my way for the next time we do E.
If you are new to A Craft a Day
A Craft a Day gives you five activities that you can enjoy with your kids, one for each day of the week. Most of these activities work well for preschoolers, but you may be able to adapt them for your toddler. If you want to learn more about the basics of A Craft A Day you can find them at a Craft a Day: Coming Back Soon. I will post the crafts on Saturdays so you can use the weekend to get any supplies that you may need. We are making our way through the alphabet this year so if you missed a you can find it here.
Are you Supermom?
Now I’m not supermom and I don’t expect you to be either. We don’t always get to each activity, sometimes life is just too busy. Hopefully you may try one or two of these activities with me and my kids! You don’t have to do every single one. You don’t have to be doing preschool with your child. I just hope to give you a resource for some great fun with your kids!
The Crafts:
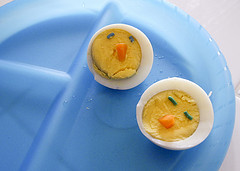
Chickie Eggs – These were cute and almost too easy. Zane loved putting them together I don’t know how his ended up with a frowny face but it was pretty funny. (Make sure and keep the shells for the other projects.)
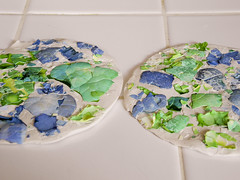
Earth Mosaics – This was a great project for bible day. The boys colored pictures in the morning and we talked about how God made the heavens and the earth. Then in the afternoon we made our earth project. This is definitely a keepsake project.
More Mosaics – You can do this project in addition to the Earth Mosaic project or if you don’t have or want to deal with clay you do this project instead.
Egg Geodes – We tried this science experiment but for us it failed. If you have any luck getting the crystals to grow please let me know!!
Egg Planters – We had some extra grass seed in our garage and I hope the grass will grow in time for the letter G! Or maybe I hope to keep the grass alive for the letter G.
Supplies: eggs, carrots, black sesame seeds or food markers or sprinkles, clay, egg shells, food color, vinegar, Elmer’s Glue, alum, paint brush, glass or plastic container, hot water, grass seed, potting soil, paint
Be Featured
If you do any of these crafts and happen to take a picture or write a blog post about it please make sure and share your link in the comments. Also don’t forget to link the original crafter! I may feature you and your blog on the following weeks post!
Recently someone asked me where I got the code for my social media icons. I see a lot of blogs that use their icons wonderfully, yet there are a few bloggers struggling with how to set up their social media icons and how to make it look beautiful. Some sites you can’t find the icons because they are hard to read, too small, or too spread out. Worse yet some sites just don’t have any icons so readers are unable to connect to the blog and blogger.
Today I’m going to share with you how to choose your icons, where to find great icons, and how to add the icons to your blog.
How to choose the right icons for you.
Tip 1 – Keep in mind the style of your site. If you have a really clean and simple layout pick out clean simple icons. Icons that are hand drawn or “messy” will be distracting or look out of place. If you have a dark layout you want to make sure that your icons aren’t too dark and blend into the background and get lost. But you don’t want to pick out icons that are too light and stick out like they don’t belong there.Try to match the feel of your site. Try out a few different sets of icons.
Tip 2 – Find a set that has all the icons you need. Consistency is key here. If you choose all your icons from the same set you are going to make it easier for your readers. The group of icons will catch their eye and they will easily be able to identify this is where they can connect with you and your website! If you have one icon that isn’t from the set it will look like it was an after thought and ruin the feel of the rest of the icons.
Tip 3 – If you make money on your blog make sure that you choose an icon set that is okay for commercial sites. Usually the designer will mention this on their site or have it with the file.
Where to Find Amazing Icon Sets
I use a few different resources to find icons for me and my clients. One of the first places I go is Iconfinder.com, this is a searchable bank of icons where designers can get together and share their artwork! There are other icon search engines, but so far I like this one the best. They have a slide bar so you can select the sizes you want to look at. They also have a drop down menu for showing only commercial friendly icons. Also you can see what the icons would look like on a light background or a dark or if you have a patterned background or bright color you can use the grey button to make sure they have a transparent background.
Another tool I use to find icons is Google’s Image Search. Search terms you can use are “social media icons” or “social icons”. You will be able to find the sets because most designers use an image of all the icons together. When you see an image like that of icons that you like. Click on it. You should be then taken to the image in a window. Click out of the box and you will see the designers post about the icons. Or you may be taken to a design site that is talking about that specific set of icons or has a list of great icons. Have fun searching, designers are constantly adding more and better icons so I’m sure you will find something amazing!
How to Add Icons to your Site
Now that you have found a set that you like. Download the set and then pick out the icons you need (twitter, facebook, rss, etc). Upload your icons to your site or where you keep your images for your blog. Grab the URL of each icon.
Are you ready to quickly learn some basic HTML? I’m using twitter as an example but you will use this for each of your icons.
Now that you have your html code how do you add it to your site? If you are on WP you go into your widgets and add a text widget to your sidebar and enter your text. Blogger same idea only you use an html gadget on your sidebar.
I hope this was helpful to you and that you find some great, amazing and beautiful social icons for your site. If you were curious the set I use on my personal blog is from Productive Dreams and is called Page Peel. If you try this out I would love to see it on your site so add your link to a comment! Or if you found an icon set that you really love share it with me, I’d love to see it!
[box type=”info” style=”rounded” border=”full”]Originally posted on my blog at Uniquehorn Designs, but that blog will be closing and moving to PepperScraps.[/box]
Today a friend asked how I got the pictures of the dinosaurs for the Color Science project. I actually print out a coloring sheet for each boy for each lesson day, so I find 8 coloring sheets for each week on the letter of the week. I have gotten really good at finding coloring sheets for them. Here are some of my tricks.
I have a few bookmarks for sites for coloring, but when I’m looking for a specific subject I use Google Images.
Search Terms
The terms that I use to search include:
preschool _____ coloring sheet
preschool _____ coloring pages
______ coloring sheet
______ coloring pages
I also do letter tracing pages for Zane, these are the searches I use to find those:
(LETTER) tracing worksheet
(LETTER)(SUBJECT) tracing worksheet
tracing letter (LETTER) preschool worksheet
tracing letter (SUBJECT) preschool worksheet
You will get lots of options, plus Google will give you more search terms to try also.
Refine Your Search
You can refine your search by clicking black and white images and also clicking line drawings in the sidebar. This is great if you get a lot of photos and art in your results and want to get straight to the coloring pages.
Find the Best Page
You will have to open up a few to make sure that they are a high quality printable image.
To do this right click on the image you like and select “open in new tab”.
You will have to close the window that pops up in front of the new tab and look at the page offering the coloring sheet.
Print
Most of the sites offering a coloring sheet will have a print button available or have the page in a pdf that you can download and open.
Now you have unlimited coloring pages for your kids!
This week is all about dinosaurs and I found way too many fun ideas!! My list was overflowing with great crafts!
If you are new to A Craft a Day
A Craft a Day gives you five activities that you can enjoy with your kids, one for each day of the week. Most of these activities work well for preschoolers, but you may be able to adapt them for your toddler. If you want to learn more about the basics of A Craft A Day you can find them at a Craft a Day: Coming Back Soon. I will post the crafts on Saturdays so you can use the weekend to get any supplies that you may need. We are making our way through the alphabet this year so if you missed a you can find it here.
Are you Supermom?
Now I’m not supermom and I don’t expect you to be either. We don’t always get to each activity, sometimes life is just too busy. Hopefully you may try one or two of these activities with me and my kids! You don’t have to do every single one. You don’t have to be doing preschool with your child. I just hope to give you a resource for some great fun with your kids!
The Crafts:
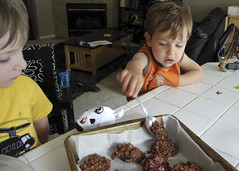
Dinosaur Bone Cookies – I love how Stacie relabeled all the ingredients to make them dino related! Plus these are very yummy treats! I halved the recipe to stop from being the one to eat them all. Both boys helped making these.
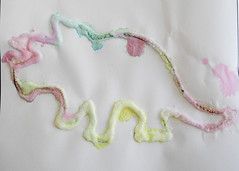
Color Science: Drip Drop Dinosaurs – I’ve been wanting to do this project for a while, but decided to pull it out today. We drew dinosaurs but you could actually draw anything.
Dinosaur Dig – I actually made these “egg” then I buried them in a bucket of dirt. I actually did this with Zane when he was younger too. It was so fun we had to do it again
Pipe Cleaner Dinos – I wasn’t sure if Zane could do these but I wanted to challenge him to try.
Dinosaur Stomp – I saw these and fell in love! We had to do them. I knew both boys would love running around in them, who cares if I needed to buy 4 boxes of tissues!
If you do any of these crafts and happen to take a picture or write a blog post about it please make sure and share your link in the comments. Also don’t forget to link the original crafter! I may feature you and your blog on the following weeks post!
Your header is the second most important design element of your blog, #1 being your logo. You want to catch your readers attention and tell them something about your site within the first few seconds of loading. Your header is the best area to do this. What kind of header do you have? What kind of header should you have?
Changing Trends
I have talked before about how header trends are changing. Headers used to be large and take up at least half of the screen, but now you will find all kinds of styles. Everything from the traditional to just the simple logo. These changes started because people started using the Above the Fold Theory.
Above the Fold
This is a theory from the newspaper age: that the top half of the paper that is visible when folded should hold your most important story and photography. When this started transferring into web design people started squishing as much stuff as possible in the top of their site. All this did was to make things cluttered and destroy the beauty of the design.
Current thought has started changing. Designers realized people are getting used to scrolling and will look at the whole site. Why should we not start spreading out the elements of the design to make them easier to see and make them eye catching.
From this evolution of design we have gotten tons of new header trends. Let’s take a look at the seven I found.
Traditional Header
The traditional header is still in use, it may not be half a page anymore but it’s still here. This is a great way to either tell a story, showcase your style, show off photography talent, or as above display an artistic ability.
The Small Header
The small header is a hybrid of the traditional header. People loved the space to showcase their photos and personality, but they wanted their visitors to be able to get straight to the content. Creating a smaller, half-sized, header will give you the best of both worlds. This is also a very popular style.
Logo Only
The extreme opposite of the large headers is just placing a logo at the top of your site. This gives lots of space for ads, call to action and content. The content is right at the top so visitors can jump right in and read. One nice feature of the logo only header is that it creates a clean and simple feel.
Featured Section
With all the added space that web designers got from loosing the large headers they realized they could create new elements. One of these elements was a section to feature the newest blog posts, favorite article, or a product (as Darren is doing on his site).
Slider
Another element created to fill up the space from the age old headers was j Query sliders. Sliders are very similar to feature sections but more dynamic and interactive. Usually you will find three to six slides that either slide automatically or by the press of a button. A slider can feature the same posts, articles, and products as a feature section, but adds more content in the same amount of space.
Instant Call to Action
One of the newer trends is to create an instant call to action area. You can use this section to invite your visitors to learn more about you, to buy your book, or to try out a product. You don’t see call to action sectionss on blogs as much as you do on basic web sites.
Typography
The amazing things you are now able to do with fonts in web design has created a new trend: typography. The art of typography is a big trend this year and it will be interesting to see if it continues as more fonts become available. This is also not something you see as much on blogs.
Conclusion
Those are the 7 trends I have seen in web design for headers. Do you have any good examples of headers that fall into these categories? Or do you have a trend that I missed?
What is your favorite header style as a reader? What is your favorite style as a web site owner?


You must be logged in to post a comment.